HAB INTRO
A High Altitude Balloon (HAB) is used to carry a payload into the upper stratosphere of space, from 60,000 to 120,000ft. HABs are quickly breaking into the amateur arena with a plethora of information available on the internet and widely available parts available for consumers.
Continue reading to discover best practices, and piggyback off all our extensive research!
WHY WE DID THIS
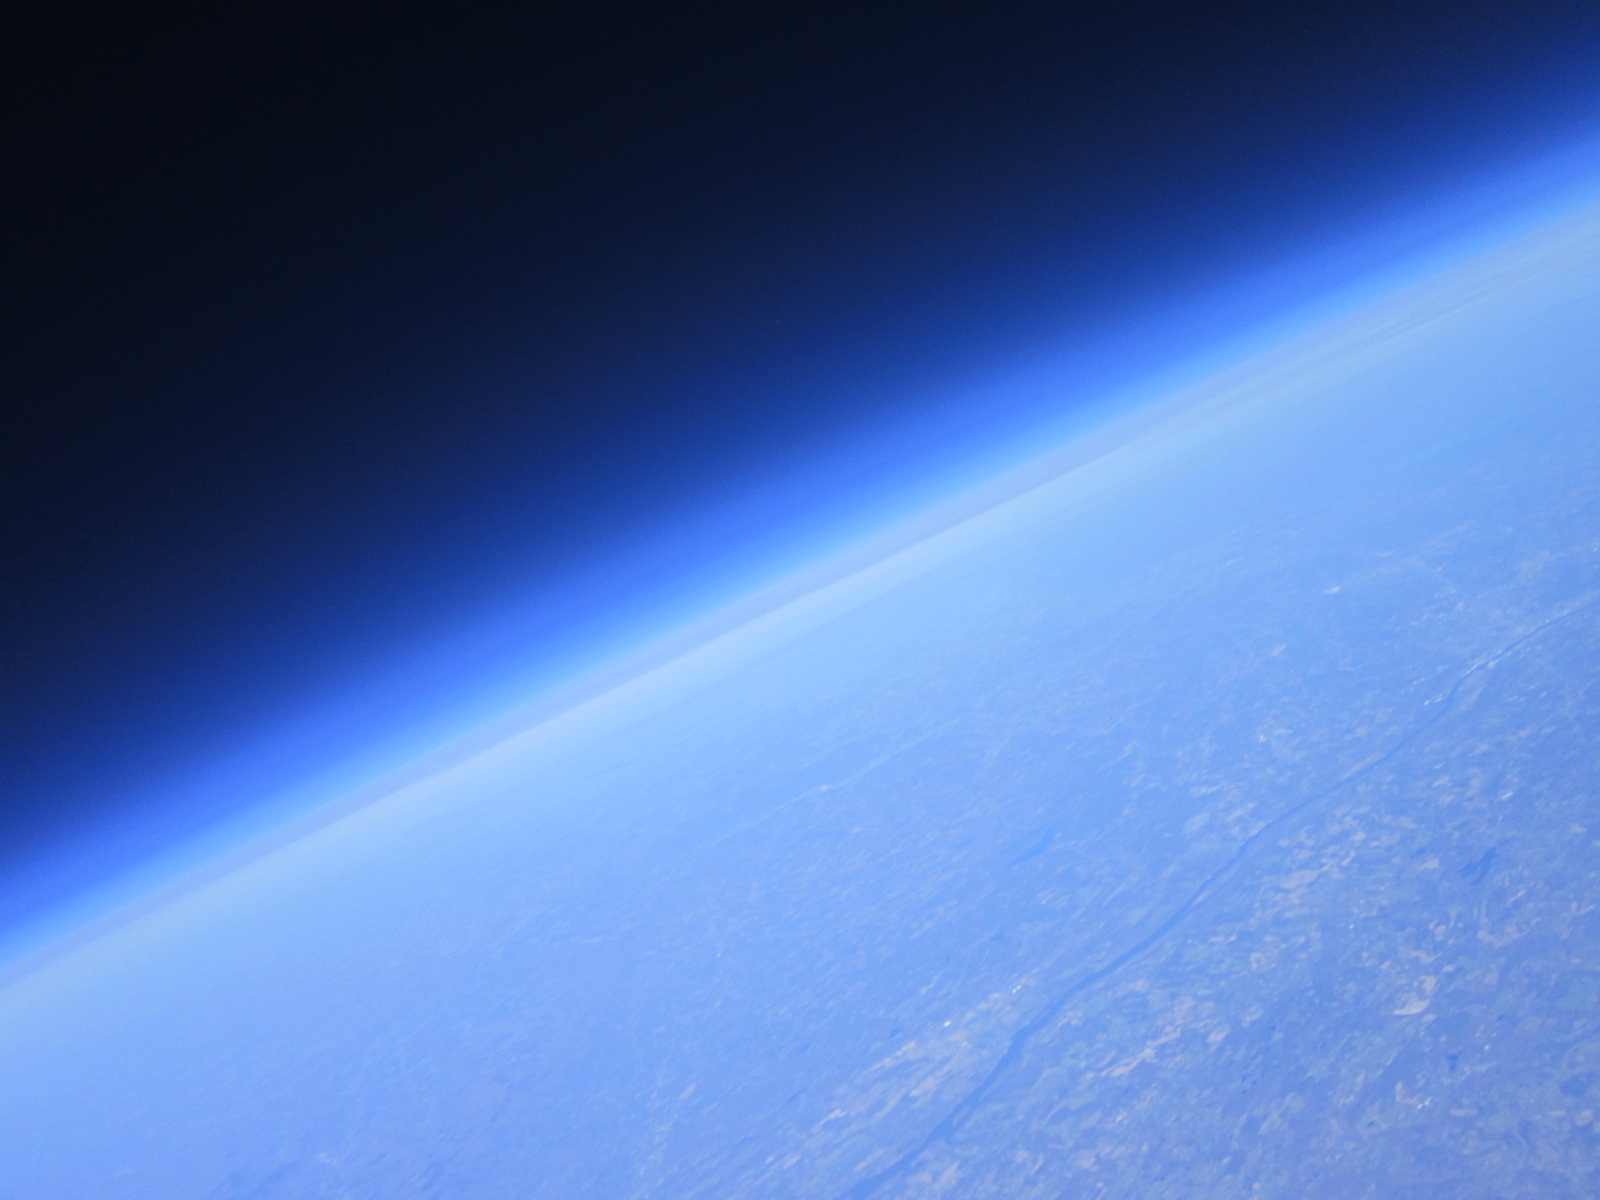
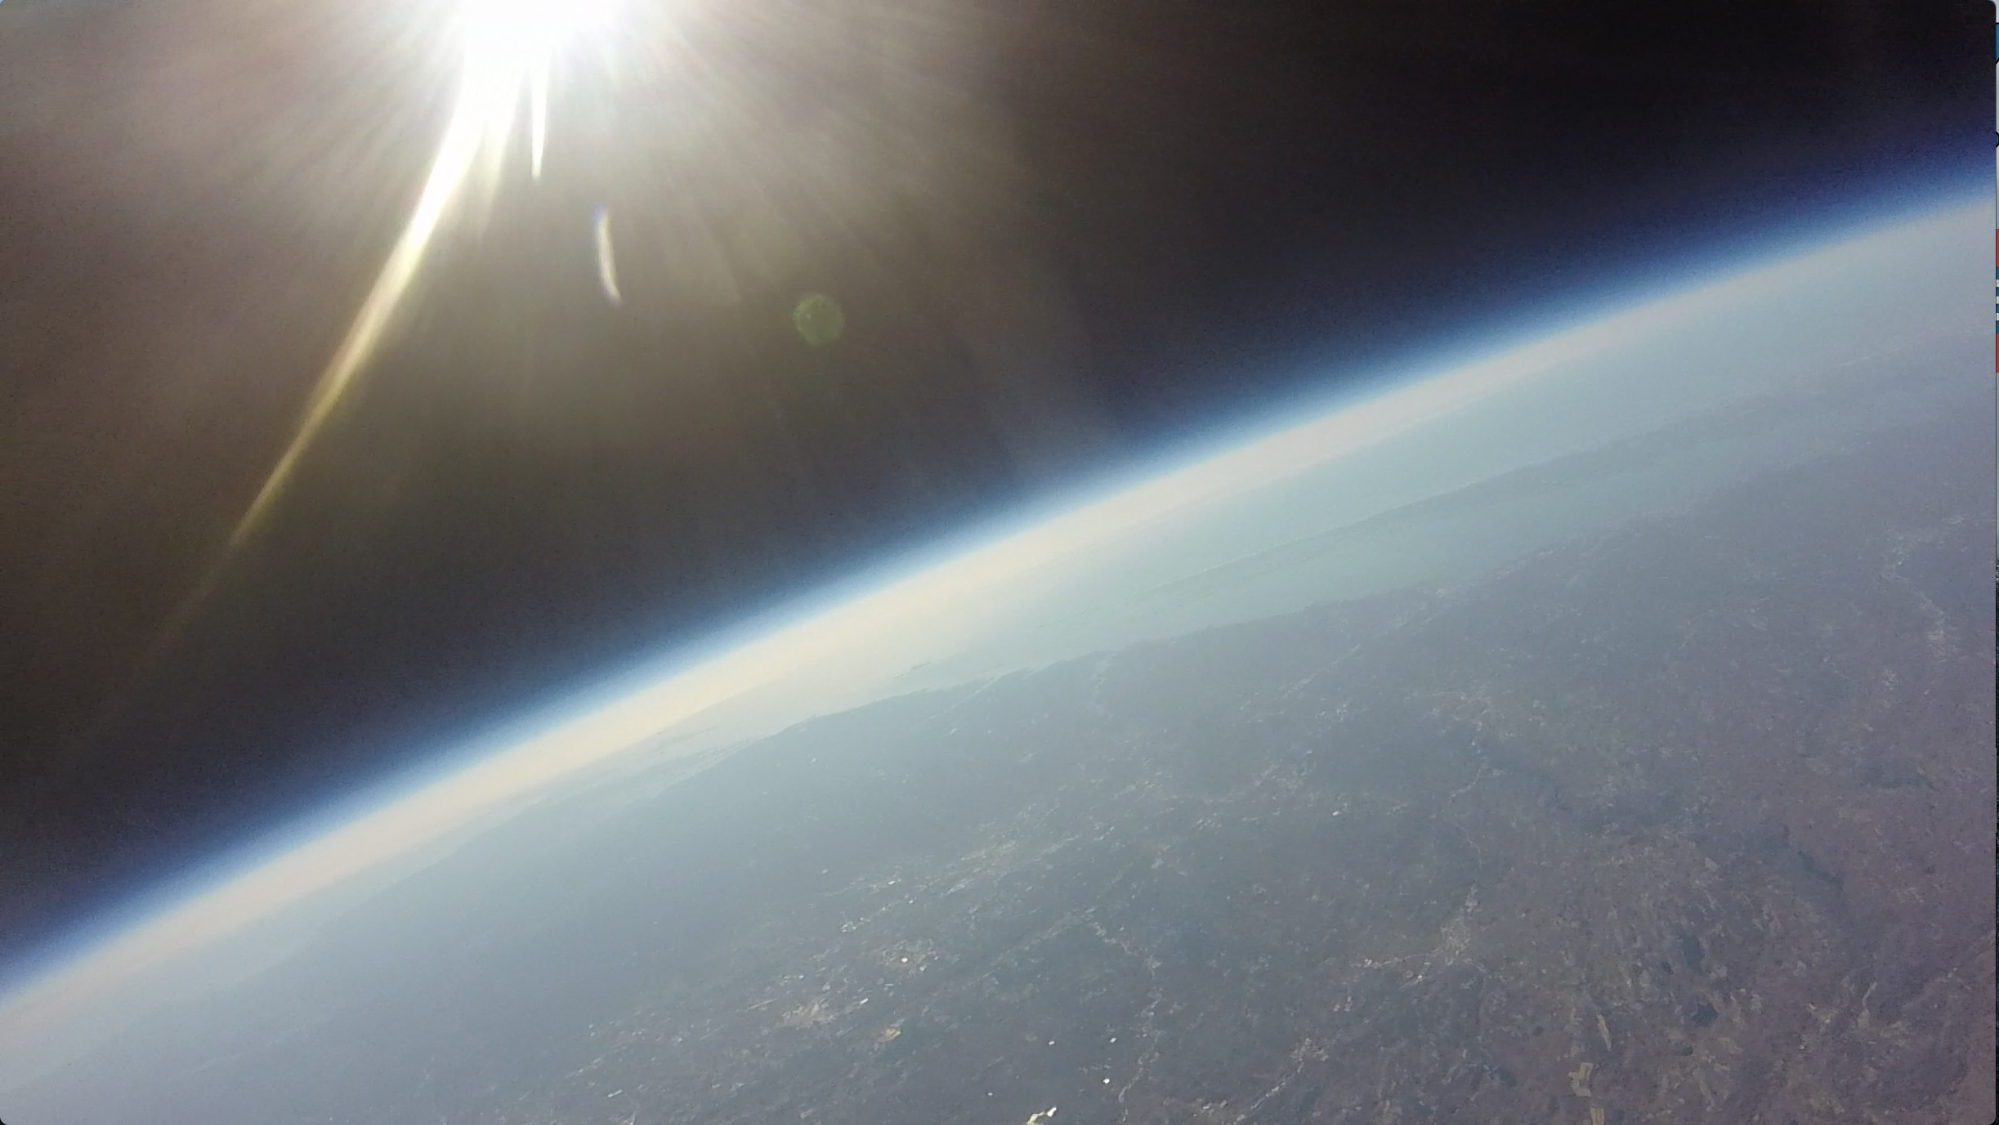
The allure of sending something into space has always fascinated us. Even better, if we could capture a photo of the curvature of the earth, that would be the ultimate photograph. So when we found out about the Global Balloon Challenge, we immediately signed up. The challenge runs yearly in early spring, and helps aspiring hobbyist reach the edge of space. The community is made up of everyone from MIT engineers to backyard hackers. We were surprised how relatively easy it was to launch a weather balloon, but as with any major project, there are complexities and scheduling risks.
WHO WE ARE

Curious, hard working, and determined; together we are the Cope Brothers. Jeremy is a computer engineer by trade and owns his own technology company, Emma Technologies. Jason is a mechanical engineer and currently works in the medical devices field. Together, we enjoy designing, building, and pushing the bounds of adventure.
NECESSARY COMPONENTS
In order to launch a weather balloon, there are six essential items:
- Balloon
- Parachute
- Radar Reflector
- Payload
- Flight Line
- Helium
As you start to research each of these items, you will soon find out that there are plenty of different options out there. Where should you purchase these items? What size should you get? There are many questions you may have going into this. Luckily for you, we have done extensive research and will provide you with the necessary guidelines to have a successful launch.
BALLOON
Weather balloons are referenced by their weight (in grams specifically). The heavier the balloon, the greater the potential to reach higher altitudes. For example, a 600g balloon may only be able to reach 80,000 ft., while a 1200g balloon could reach over 100,000 ft. Furthermore, it is important to keep in mind that the weight and potential height of a balloon may vary depending on the manufacturer. High Altitude Science claims their 1200g balloon can reach 110,000-120,000 ft., while Kaymont Balloon specifies their 1200g balloon can reach 105,000-115,000 ft.
When deciding where to purchase your balloon, it is highly recommended not to buy one off of eBay. Those balloons may be cheaper, but that is because they are made of lower quality material and are very likely to pop prematurely. We ended up going with a 1000g balloon from Kaymont for $70. They are a very reputable manufacturer for weather balloons. The quality of their balloons is great and at a lower cost than most competitors.
Make sure you wear latex gloves at all times when handling the balloon. If the oil from the skin or any other contaminant comes in contact with the balloon, you risk the balloon popping prematurely.
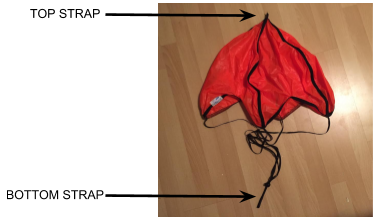
PARACHUTE
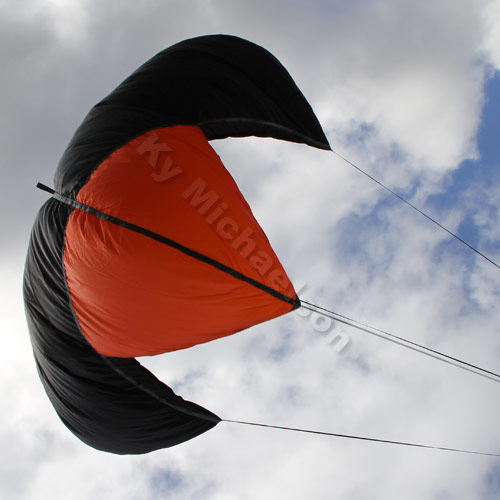
The important specification to keep in mind when buying the parachute is the descent rate. The lighter your payload and the larger the parachute, the slower the payload will fall to the ground. However, the slower the descent rate the further it will travel and descend too fast and you risk damaging the payload and any equipment inside.
Most manufacturers help you decide what parachute will best fit your needs by specifying what the descent rate will be depending on the weight and size of your parachute. Rocketman is a reputable brand that is not too expensive. Here is an example of their specs:
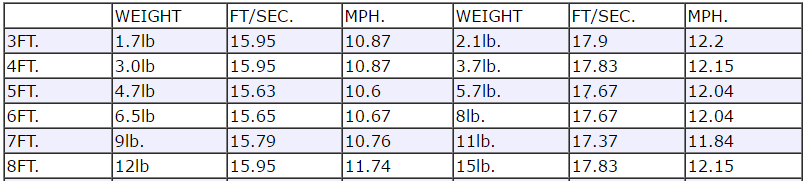
We ended up choosing a 3 ft. parachute from Rocketman. With a payload of about 3.3 lbs., that put us at a descent rate of approximately 22 ft./s. I would not advise a descent rate over 25 ft./s. Although our payload survived without any damage, our equipment became dislodged from our fasteners. Any faster than 25 and there would most likely be damage.
RADAR REFLECTOR
The odds of an aircraft flying into your weather balloon is highly unlikely; however, the FAA requires any airborne object to have some sort of radar notifier. This will allow any nearby aircrafts to see your balloon and avoid any collisions. A radar reflector is the cheapest and easiest way to accomplish that. You can buy one online for about $35, or make one yourself in under 30 minutes.
We came across a great Instructable online that shows you step by step how to make one. It’s durable and highly effective:
http://www.instructables.com/id/Lightweight-Radar-Reflector/
There are a few notes worth mentioning from the Instructable. Once all of the pieces are assembled together, the Instructables say that glue is not needed to hold the pieces together. However, depending on how tight the pieces formed you may want to consider taping the seams. This will help maintain the necessary 90-degree edges for optimal radar reflection. Also, there are no instructions on how to tie the radar reflector to your flight line. We will cover that in the Flight Line section of this article.
PAYLOAD
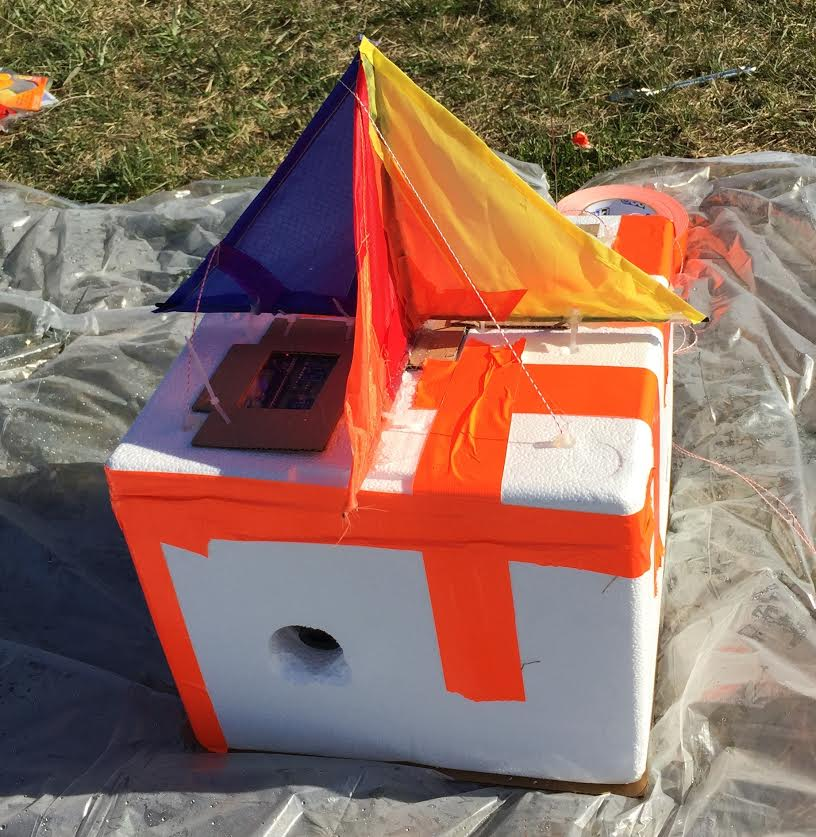
Let your imagination run wild with the payload. Searching online you will find many different designs of payloads. One is not necessarily better than the other. The main function of the payload is to hold any instruments or items you wish to carry. The most common design is a styrofoam box. Styrofoam is lightweight, durable, and will help insulate all instruments from the cold. Egg-shaped containers and even tripod structures are also common. We ended up going with a 12”x12”x9.5” styrofoam box. You can purchase one for about $20 on Amazon.
The other benefit of styrofoam is that it is very easy to cut and carve to help encase any instruments such as cameras. However, before making any cuts in the styrofoam, it is recommended to practice the cut on a scrap piece of styrofoam. This is especially important for any cameras you plan to mount. Depending on the zoom and angle of the camera, a cone shaped hole might be necessary to prevent the box from being visible in the camera's pictures.
How do you fasten cameras, batteries, and other components to the payload box? Hot glue, zip ties, and duct tape are great means to fasten your instruments. We were skeptical at first using duct tape because it is not rated to withstand the cold temperature that your weather balloon will reach. However, the duct tape held up incredibly well; so well that when we tried to remove the tape after we retrieved the payload it ripped off some styrofoam with it.
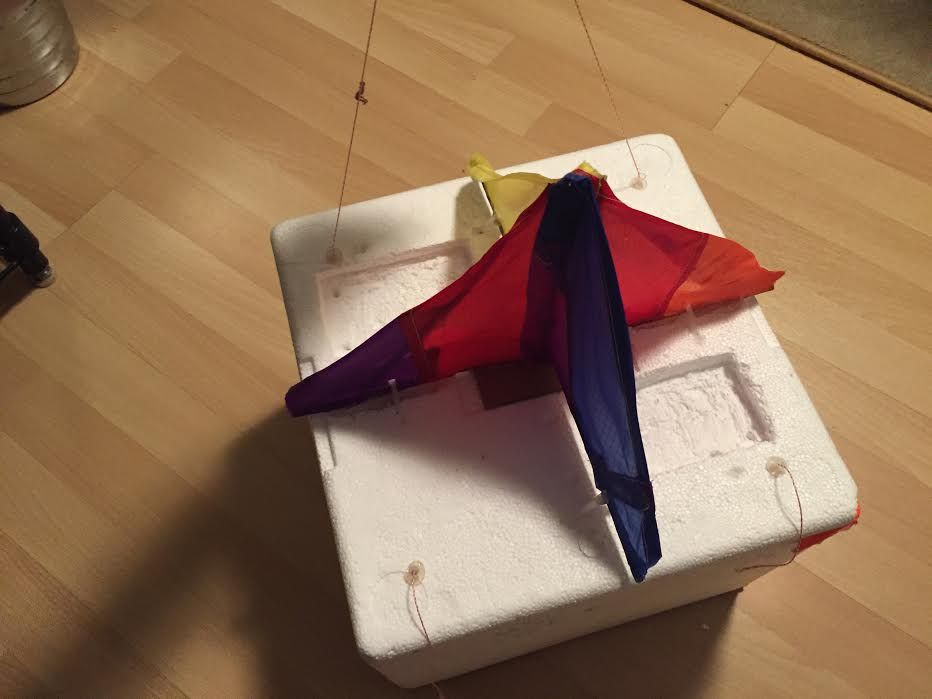
One of the most common issues all weather balloonists experience is spinning. As the balloon rises the payload will tend to spin. This can be very troubling if you are trying to take pictures or videos. There are many different ideas and designs you can find online, but after much research we found kite flaps to be the most cost effective and lightweight solution. These flaps will help stabilize any rotation or wind.
To construct the stabilizer, first purchase a kite online (no more than $20). Next, cut the kite material into triangles. Using the carbon fiber rods that came with the kite, cut those down and hot glue them to the triangles you cut. Once you constructed the stabilizing flaps, you can attach it to the top of your payload box using hot glue and zip ties.
FLIGHT LINE
The flight line is one of the most critical components to the entire weather balloon structure. If the line breaks or a knot fails, game over! You may end up losing your payload box or not reaching the height you were expecting. Therefore, it is recommended to practice tying knots and having at least two different lines tied between each component. That way if a knot fails or the line breaks you have a backup.
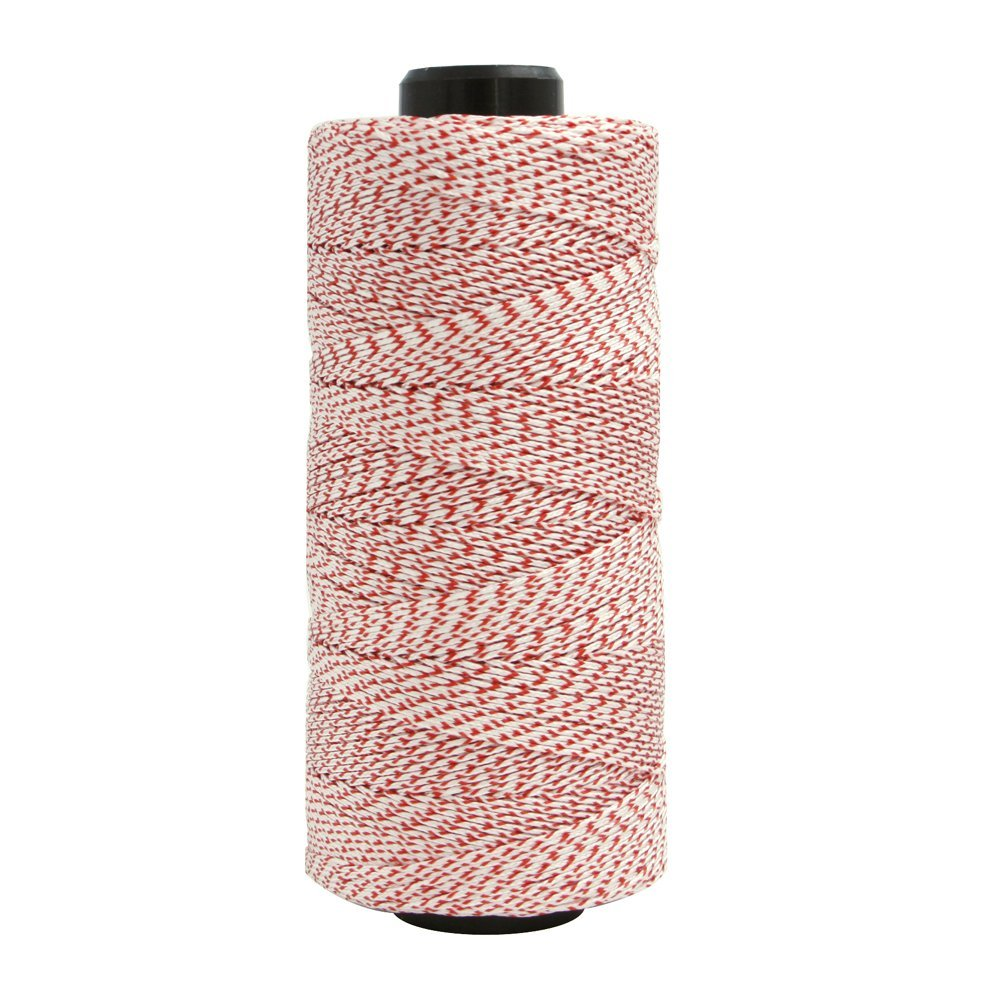
What should you use for a flight line? Kite string! It’s lightweight, durable, and there is plenty out there to chose from. Furthermore, most manufacturers have specifications on kite strings, which means you can find out what the breaking strength of the line is. We ended up going with a 50lb breaking strength in order to meet FAA guidelines and not have to commit to the provisions of subpart B (refer to FAA section for more details). The kite string shown above is made by EmmaKites and can be bought on Amazon for about $13.
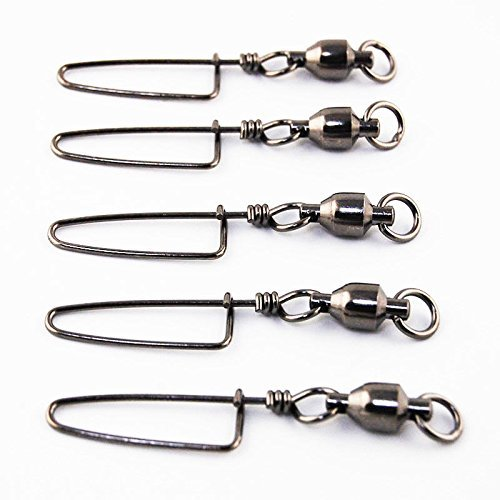
Looking around on the internet, there is very little information or instructions on how to attach everything together: payload box, radar reflector, parachute, and balloon. Fishing snaps (depicted above) are a perfect way to attach one component to the other. Rather than tying everything together and having to carry the entire weather balloon system at once, fishing snaps allow you to pre-tie all components and attach everything together within minutes of the launch. Furthermore, the swivel ball helps to eliminate any twisting and spinning the payload box may encounter.
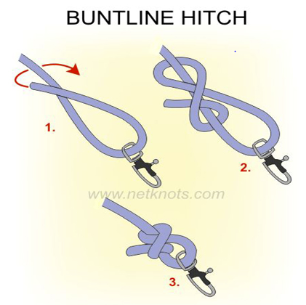
As mentioned earlier, knots are very important and must be secured as best as possible. There are many different types of knots you can tie, but after much research we recommend only two different knots: the buntline hitch and the backup knot. The buntline hitch is very secure and reliable. Once tied, any pulling or jerking only tightens it further rather than loosening. The backup knot just adds additional security. Every knot we tied had both the buntline hitch and the backup knot. The buntline hitch was the primary knot and the backup knot was used as a safety precaution to help prevent the primary knot from coming undone. The pictures below are step by step instructions on how to tie each knot.
We recommend about a total of 40 feet between the payload box and the balloon. This is how we broke it down:
The flight line secures every component (payload box, radar reflector, parachute, balloon) in a different way:
Payload Box
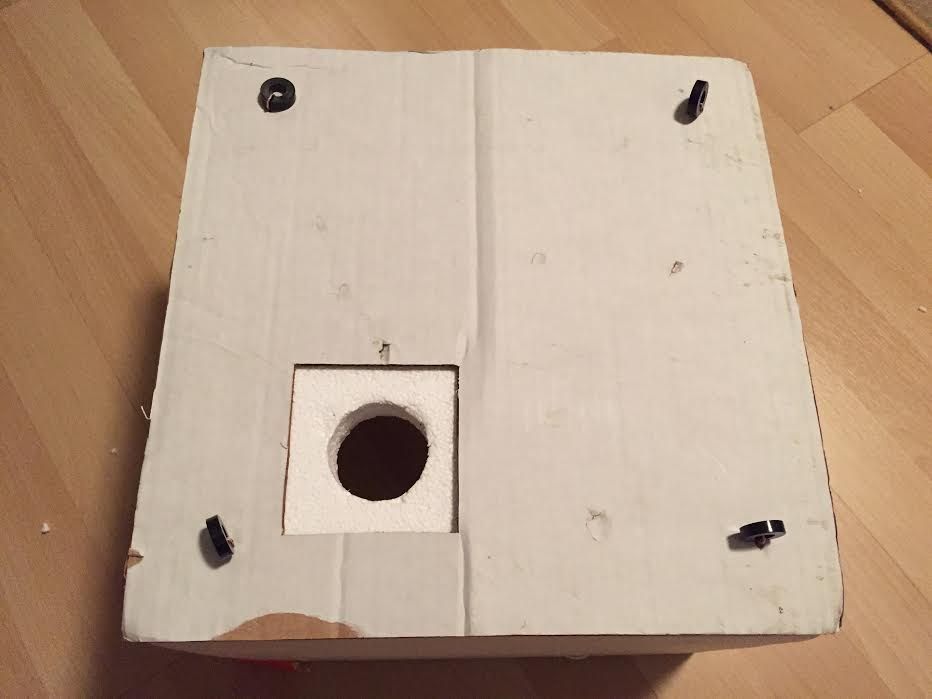
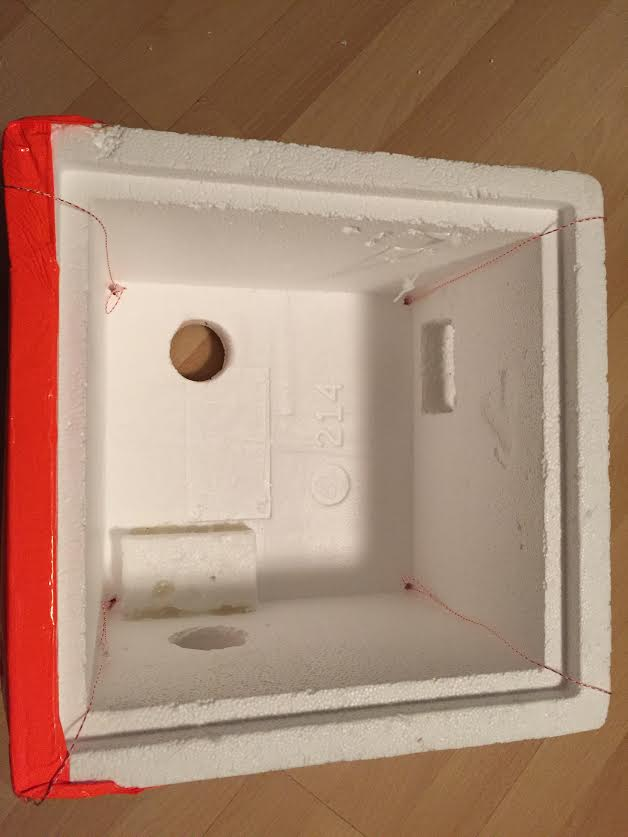
Since the payload experiences some high forces (such as the lift caused from the balloon and the impact when the balloon pops) strengthening the styrofoam is important to avoid the flight line ripping through it. The best way to accomplish this is rubber or plastic tubing and hot glue. Just punch a hole through the styrofoam with a nail, run hot glue around the diameter of the tube, and then push it through the hole you just punched in the styrofoam.
There are different ways to secure the payload with the flight line, but we felt the most effective way was running four separate lines from the bottom of the box, through the top, and tying them together to a fishing snap about 2 feet above the top of the box. To secure the flight line to the bottom of the box, we hot glued cardboard, and then tied each of the four lines to a plastic washer. The cardboard acts as a support system to prevent the plastic washers from ripping through the styrofoam (similar to the purpose of the tubes).
Radar Reflector
The Radar Reflector can be placed almost anywhere between the payload box and the parachute, but for simplicity we tied it half way. As mentioned before, using at least two lines between each component is recommended.
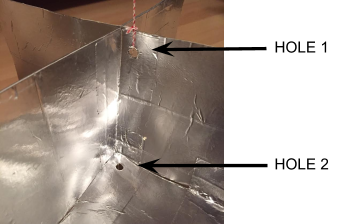
To secure the Radar Reflector, three holes were punched. Flight line number 1 was first tied to a fishing snap, then tied to hole number 1 at the top of the reflector, placed through hole number 2 (middle of reflector) and through hole number 3 (bottom of reflector), and finally tied off to a second fishing snap.
Flight line number 2 followed flight line number 1 and was tied off the same way. The Radar Reflector will now stay put and not slide down the line. In the picture below, you can see 2 of the 3 holes on the reflector. Please note that the flight line is cut and does not run through the reflector, as it should.
The bottom fishing snap from the reflector should be clipped to the fishing snap tied off from the payload box. The top fishing snap from the reflector should be clipped to the bottom strap of the parachute.
Parachute
The parachute you purchased should have two straps, one on the bottom and one on the top. As mentioned before, the bottom strap should be attached to the top fishing snap from the reflector. The top strap from the parachute will be used to attach the line to the balloon.
Balloon
Be very careful when tying off the weather balloon. Always maintain a tight grip on the neck of the balloon to avoid the balloon from flying away. For instructions on how to tie the balloon, please refer to:
http://www.highaltitudescience.com/pages/tying-off-a-weather-balloon
One important thing to note about the instructions is to make sure to wear latex gloves (as mentioned earlier). They do not wear gloves in the instructions but that is very important to help avoid any premature pop caused by the oils from your skin.
HELIUM
The amount of helium is most commonly referenced as cubic feet. The are many factors you must consider when deciding how much helium you will need.
- Size of the balloon
- Weight of the payload
- What altitude you want to reach
The more helium you put in the balloon, the faster it will rise but the lower it will pop. Even though less helium might seem like a good idea to achieve high altitude, it will rise much slower and travel much farther. To help decide how much helium best suits your needs, please refer to the calculations section.
Where can you buy helium? Almost any welding supply company, gas company, or medical supply company will allow you to rent a tank of helium. Surprisingly the cost of helium can vary greatly from one distributor to the next. Therefore, we recommend calling around and getting quotes from multiple locations.
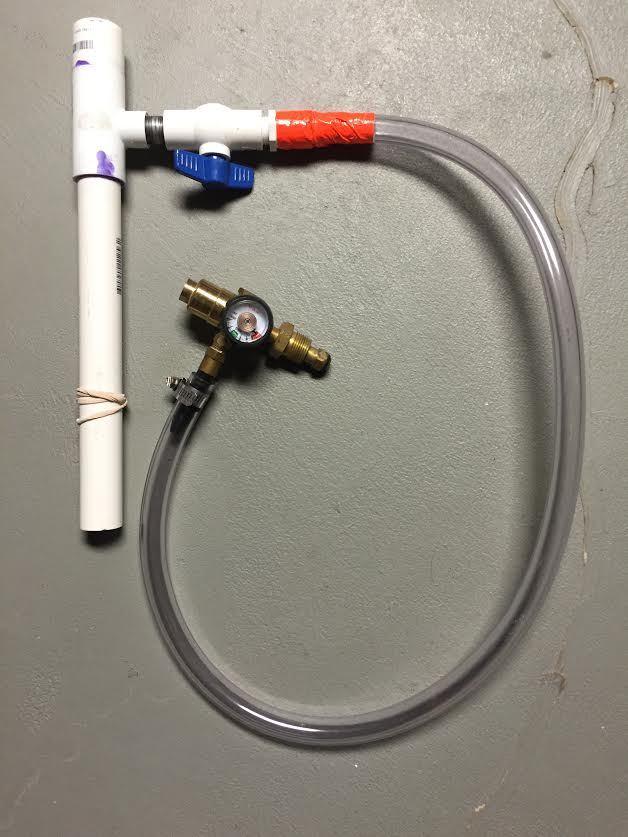
When inflating the weather balloon, make sure the helium tank has a regulator. Without a regulator the gas can fill the balloon too quickly and you risk over-inflation. There are many ways to get the gas into the balloon, but we created our own system. All you need is a rubber hose, clamps, PVC pipe, and plumber’s glue. Using a luggage scale, you can also measure the lifting force on the balloon to know when enough helium has been added. A luggage scale can be bought online for under $20. Refer to the calculations section in order to determine how much lift is required.
ELECTRONICS
The heart of our payload; this is the real stuff we want to send up to 100k feet. We decided early on that everything should have a redundancy backup. To that point, we sent up three cameras, two GPS locators, and two flight computers. Of course there are trade-offs, the more you spend into space, the more you risk losing.
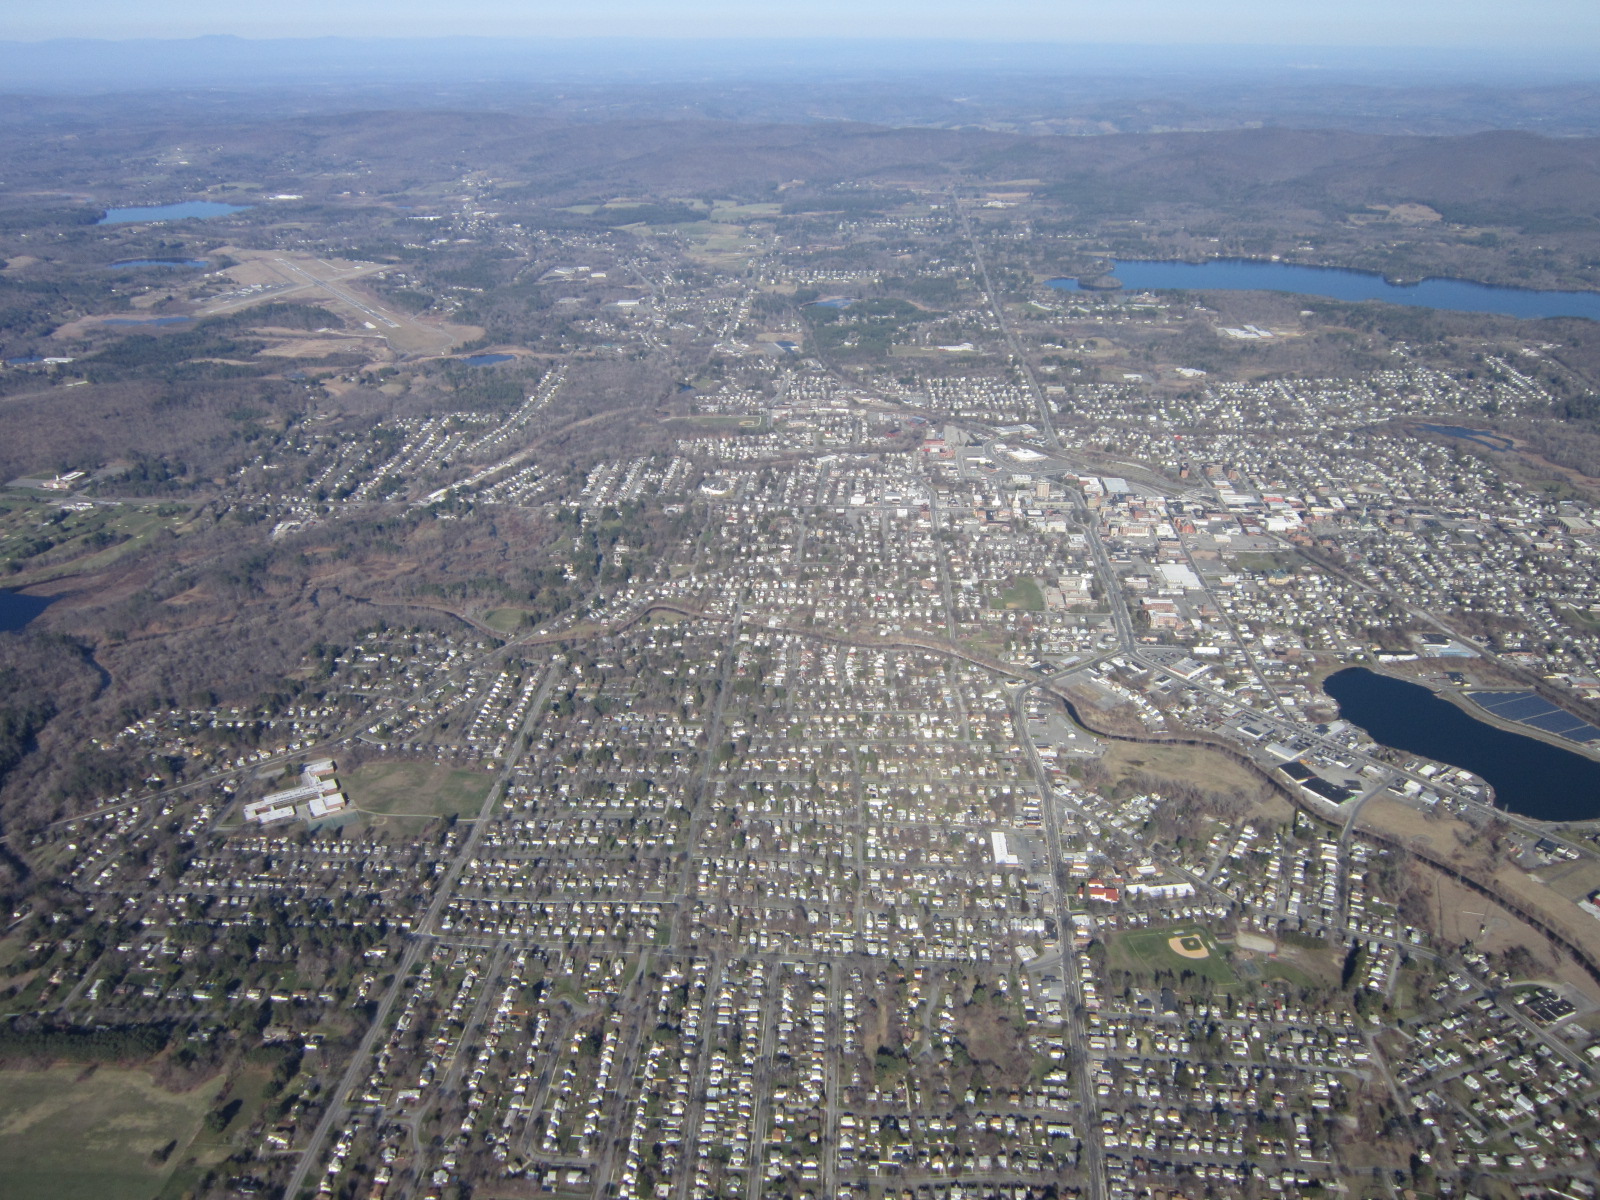
WHAT WE WANT TO CAPTURE
Pictures were a must. Why send something that high and not capture the footage? After watching other examples of High Altitude Balloons, we also realized video would also be necessary. Finally, we wanted to make sure we captured metrics during the flight such as altitude, temperature, humidity, and many others. To capture the data, we designed and built a custom flight computer tailored to our needs.
FLIGHT COMPUTER

This is the one part of the experience you will have to decide how best to tackle. There are many options available for purchase, but if you have a hacker mentality, you can follow along the build instructions on Hackaday.io. https://hackaday.io/project/12100-flightcpu
The FlightCPU is designed to capture various metrics and log them to the SD Card. With four separate sensors (some of them with dual capabilities) we were able to log the following data:
- Barometer (Pressure/Altitude)
- Temperature/Humidity
- Gyroscope/Accelerometer
- Magnetometer (Compass)
GPS
Redundancy. Redundancy. Redundancy. There are plenty of other high altitude balloon projects out there that end with 'we are still searching for our payload'. Unfortunately, this can happen to any project, no matter how prepared you are. If you include backup systems in your payload design, you help minimize risk.
After extensive research, we decided to go with an APRS GPS Tracker and a GSM GPS Tracker. The APRS tracker ties into a worldwide radio network and helps track the payload through the entire flight. The GSM tracker is a little simpler, but helps tremendously locating the payload once it lands.
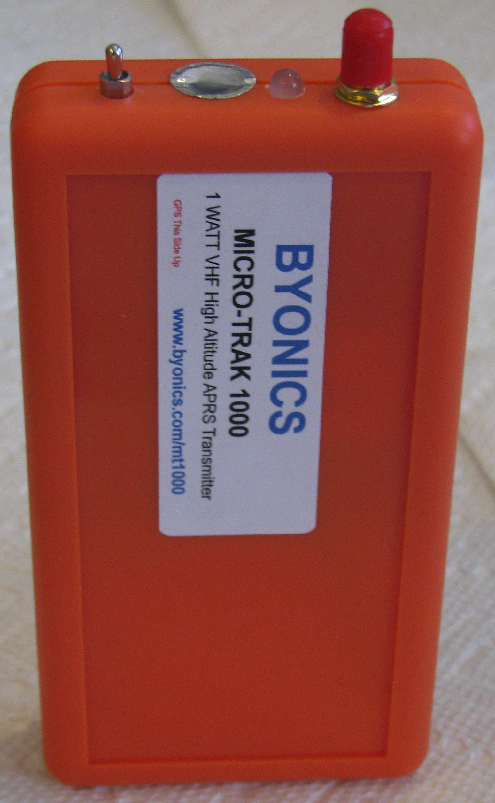
The APRS Tracker requires a HAM Operator license to operate, but if you have any sort of technical background (and $15) it is very easy to get certified. The equipment itself was not cheap (about $200), but it was designed specifically for high altitude environments and the quality is unmatched. The Micro-Trak 1000 pings the APRS network with GPS coordinates and altitude once every 3 minutes, although that can be customized. Because the device uses the VHF band, you can continue to get clear communications well above 100,000ft.
Sometimes in life you get what you pay for, and the Micro-Trak 1000 from Byonics is exactly that. If you are serious about launching a balloon, do yourself a favor and get the Micro-Trak 1000; the reliability is unmatched and having a dependable tracker is a must in this type of project.
http://www.byonics.com/mt-1000
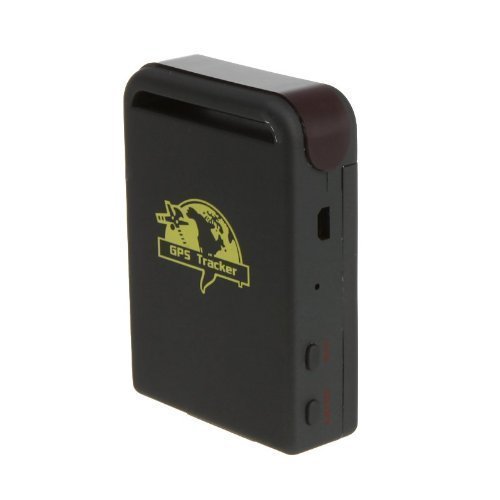
The GSM GPS Tracker was actually meant for tracking cars (read: private investigators). The downside of using this type of tracker is that it will not work without a cell network. So anything above 20,000 ft. is out of question and if the payload lands away from a cell tower, you are out of luck. That being said, as part of a redundancy system and the price (about $30), it ended up being the perfect backup.
When you call the device it responds with a text message containing the GPS coordinates. This device saved us once the payload had landed and our APRS tracker had trouble sending out a signal in the thick of the woods.
The tracker itself wasn't the easiest to setup and requires a SIM card and SMS data plan, but we found using H20 prepaid ending up being the cheapest solution. Just expect to take about an hour to set everything up before you can ping the tracker for its location.
STILL AND VIDEO CAMERAS
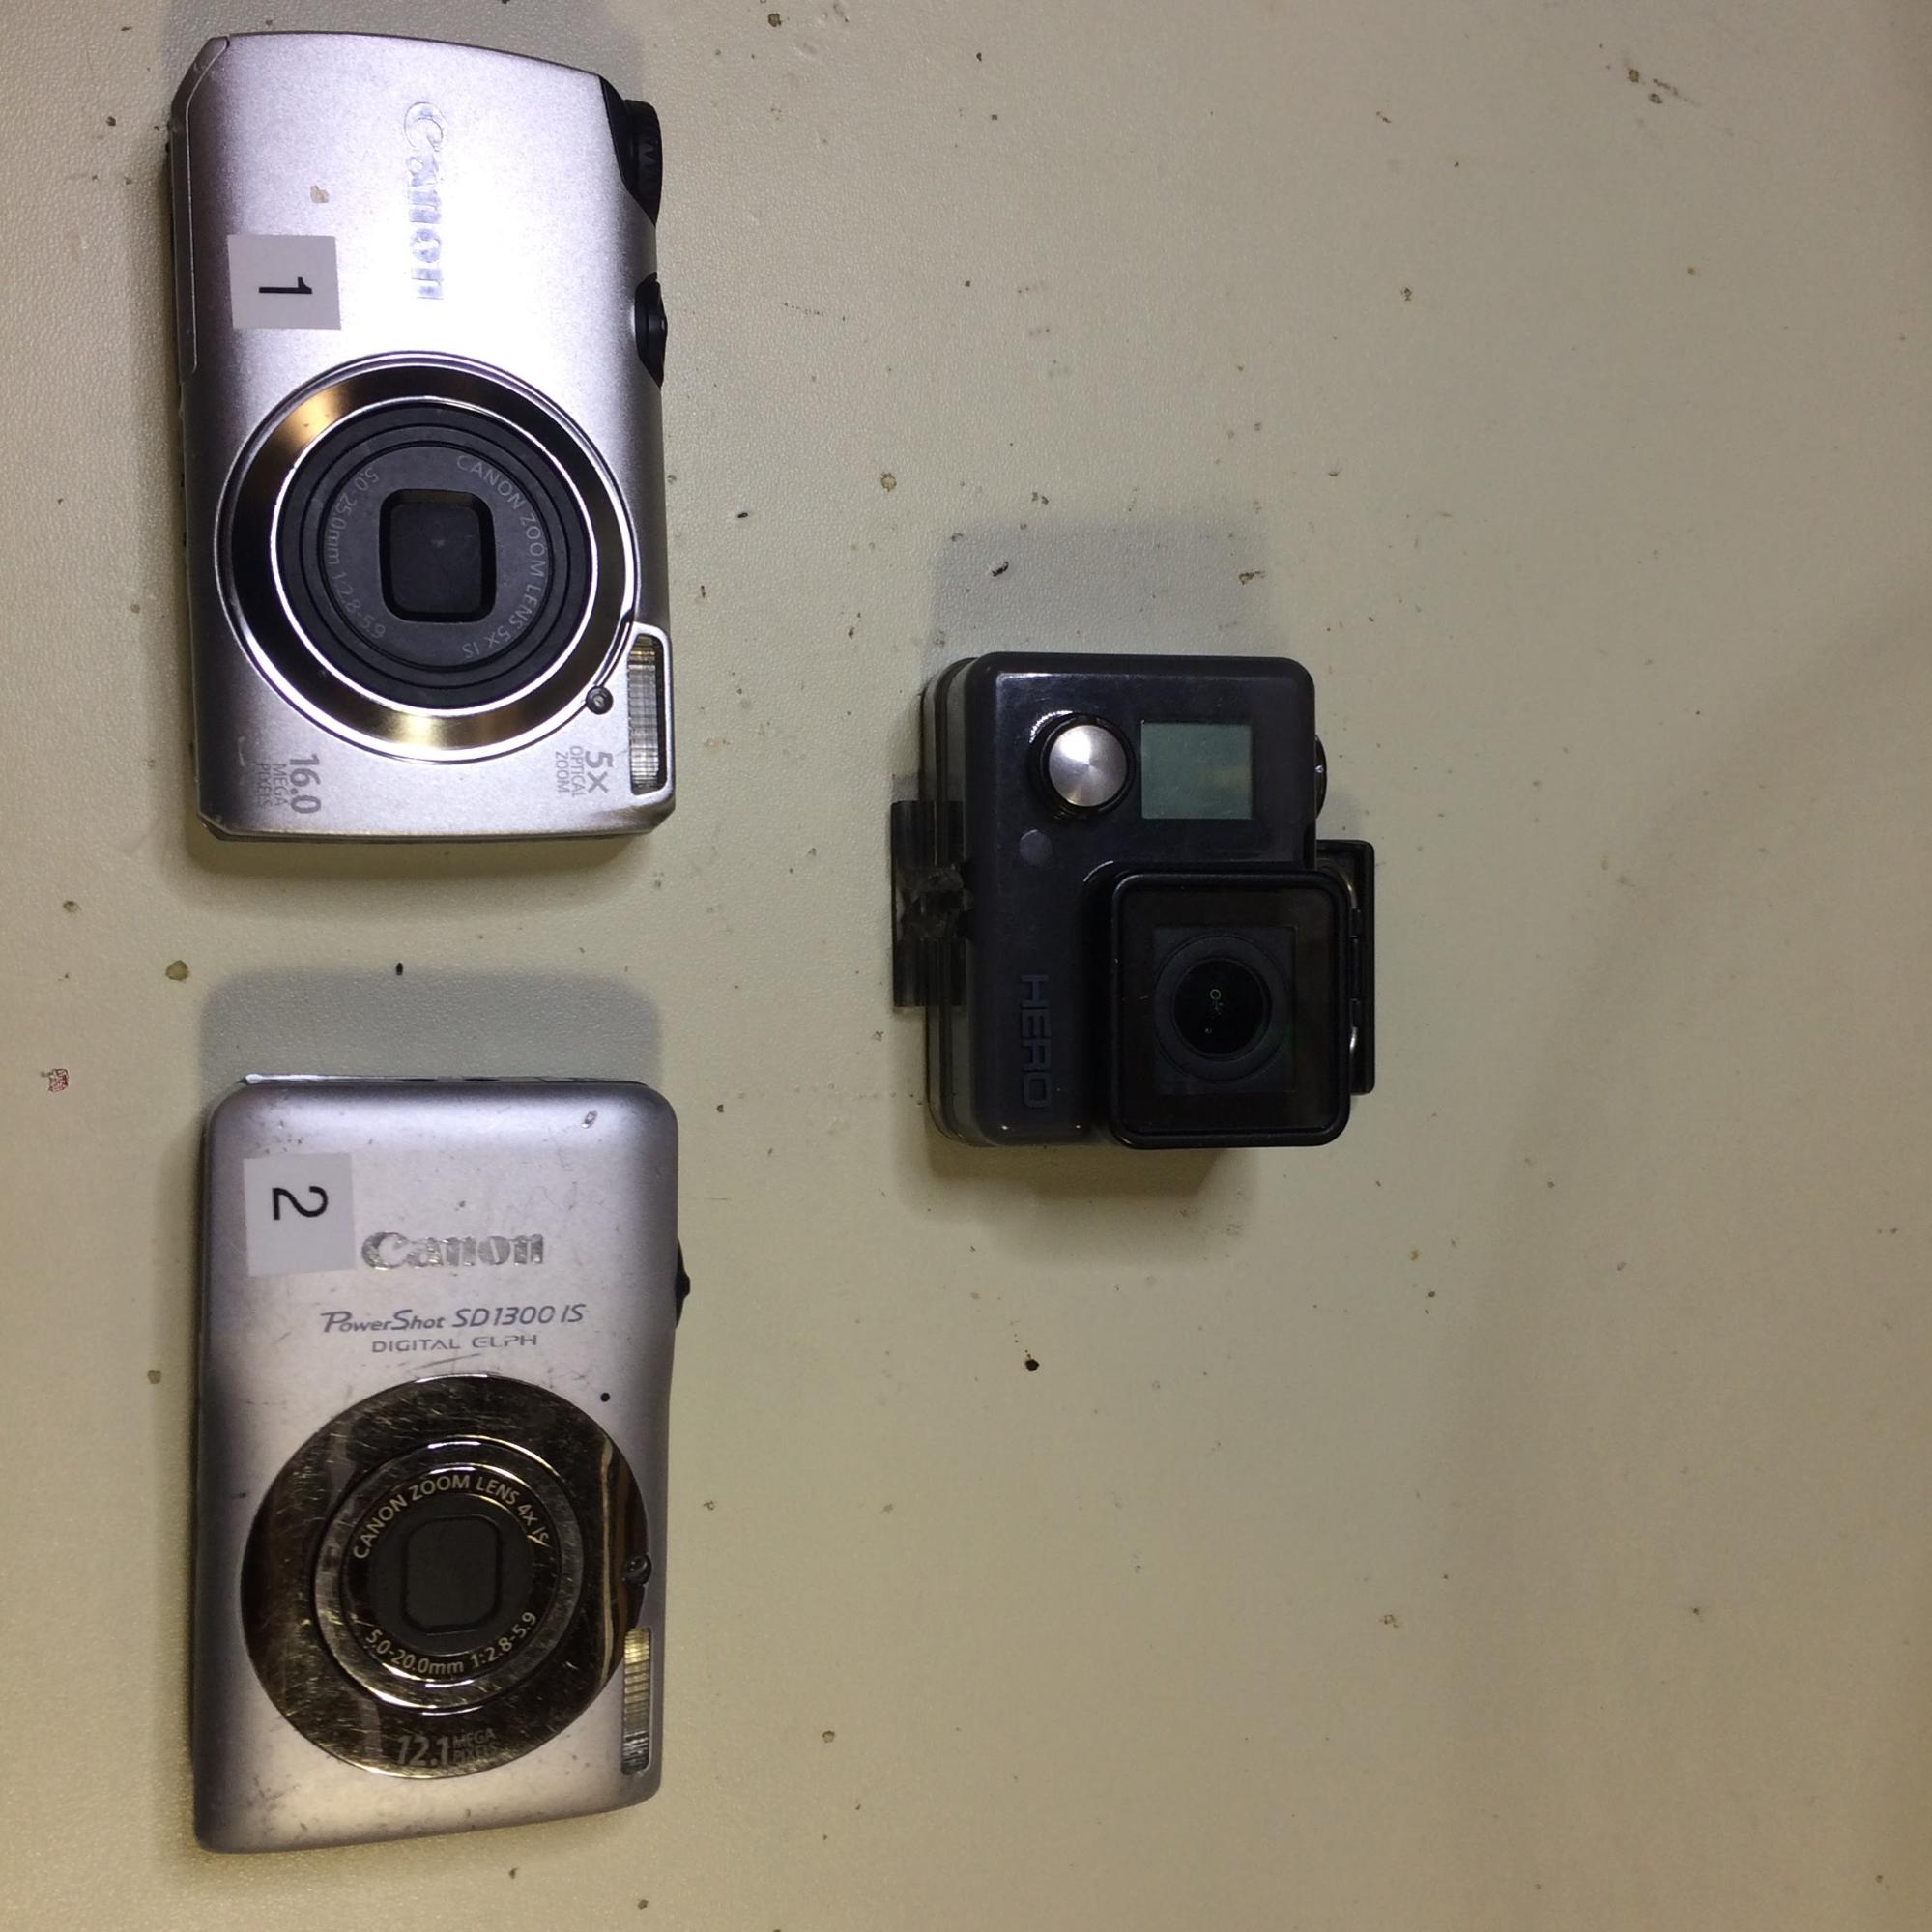
Do yourself a favor, and purchase all your cameras on eBay. Dinged cases, cracked LCDs, these are all things that don't matter when you send cameras up in space and make for big discounts. We were able to purchase all 3 cameras for under $100; a 16MP, 12MP and GoPro Hero. We ended up purchasing new batteries for the point and shoot and a USB external charger to make sure the GoPro lasted the full 3 hours.
And on that note, I highly recommend purchasing Canon point and shoots because...
CANON CHDK
Canon CHDK is an open source firmware built for Canon cameras. Once loaded onto the camera's firmware, you can easily run scripts to help capture time-lapse photos and manage autofocus the LCD screen (no need to be on during the flight!). The scripts are easily available for editing, so you can customize the capture experience. Also, consider capturing the pictures in RAW format so you can better edit the photos once you reclaim the payload.
http://chdk.wikia.com/wiki/CHDK
FLIGHT CALCULATIONS
By knowing the weight of the balloon, the size of the parachute, and the weight of the payload, you can calculate many factors:
- Ascent rate
- Lifting force
- Burst altitude
- Required helium
- Descent rate
- Total distance traveled
Luckily for you, a program on the internet exists to calculate everything at once. Students from Cambridge University Spaceflight wrote a powerful program that takes into account almost every factor including weather patterns on any given day (up to 10 days from the present) to very accurately predict the above factors and where your payload should land.
Flight Predictor
The program is very easy to use. Do not get discouraged if the first flight predictor you run shows your balloon traveling a far distance. Weather patterns play a huge factor! One day it may show to travel over 75 miles north, and the very next day it may show the balloon only traveling only 40 miles east. This program can also be used to help determine how much helium you need. Knowing the payload and balloon weight, you can input different burst altitudes or ascent rates to determine how much helium is required.
REGULATIONS
Just because you have a Radar Reflector does not mean you are given the green light to launch your balloon anywhere you want at anytime you want. Safety must come first!
FAA + ATC
The FAA has guidelines that you must meet. If you meet all the criteria laid out in Subpart A of part 101, then you do not need to contact the FAA. However, if you do not meet all criteria, you must then refer to Subpart D and follow those guidelines. If you need to follow Subpart D, contacting the FAA is required.
Even though we met the guidelines laid out in Subpart A, we still contacted the FAA as a courtesy. They may also request you to contact the ATC (Air Traffic Control), especially if you plan to launch near an airstrip. Refer to the link below to read up on all of the guidelines:
http://www.ecfr.gov/cgi-bin/text-idx?rgn=div5&node=14:2.0.1.3.15#sp14.2.101.d
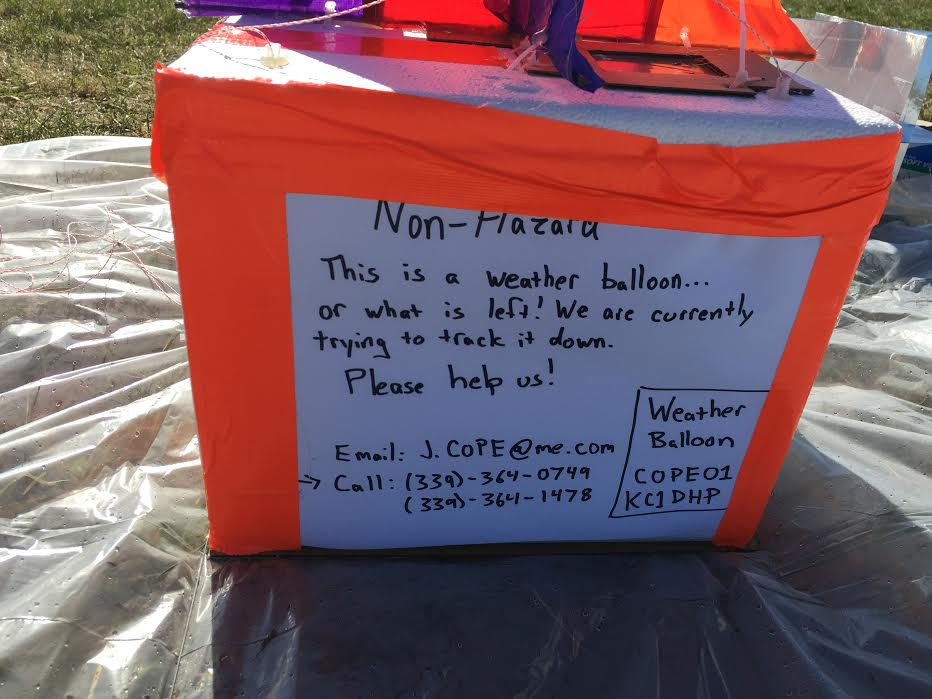
Also, make sure to tape a notice on the payload box in case someone finds it before you. We recommend placing your contact information and what the box is actually for.
RESULTS
In any High Altitude Balloon project, the definition of success is a launch and retrieval. So by that definition, our project was a huge success! Our APRS GPS tracker stopped sending out signals (rather, local repeaters stopped receiving data) once our payload landed in the woods and the line-of-sight was diminished. Here our backup GSM GPS saved the day and was able to provide a more accurate location, shaving off a square mile of searching.
Our cameras unfortunately did not fare so well. One refused to auto-focus during the flight and we are not sure why. Both point and shoots turned off during the descent, again without reason, as there was still battery left and plenty of storage space left.
The GoPro unfortunately also died on the descent, but this was clearly due to battery issues. The backup USB battery we had installed did not turn on properly, and therefore we lost out some footage.
The FlightCPU provided very interesting data throughout the flight. Unfortunately due to calibration issues, the barometer did not give us accurate results in terms of absolute altitude, but we can infer the overall flight path using relative values. Other data points from gyroscope and magnetometer were difficult to parse, and even harder to graph. We are still working on the best way to visualize this data, so any suggestions would be appreciated!
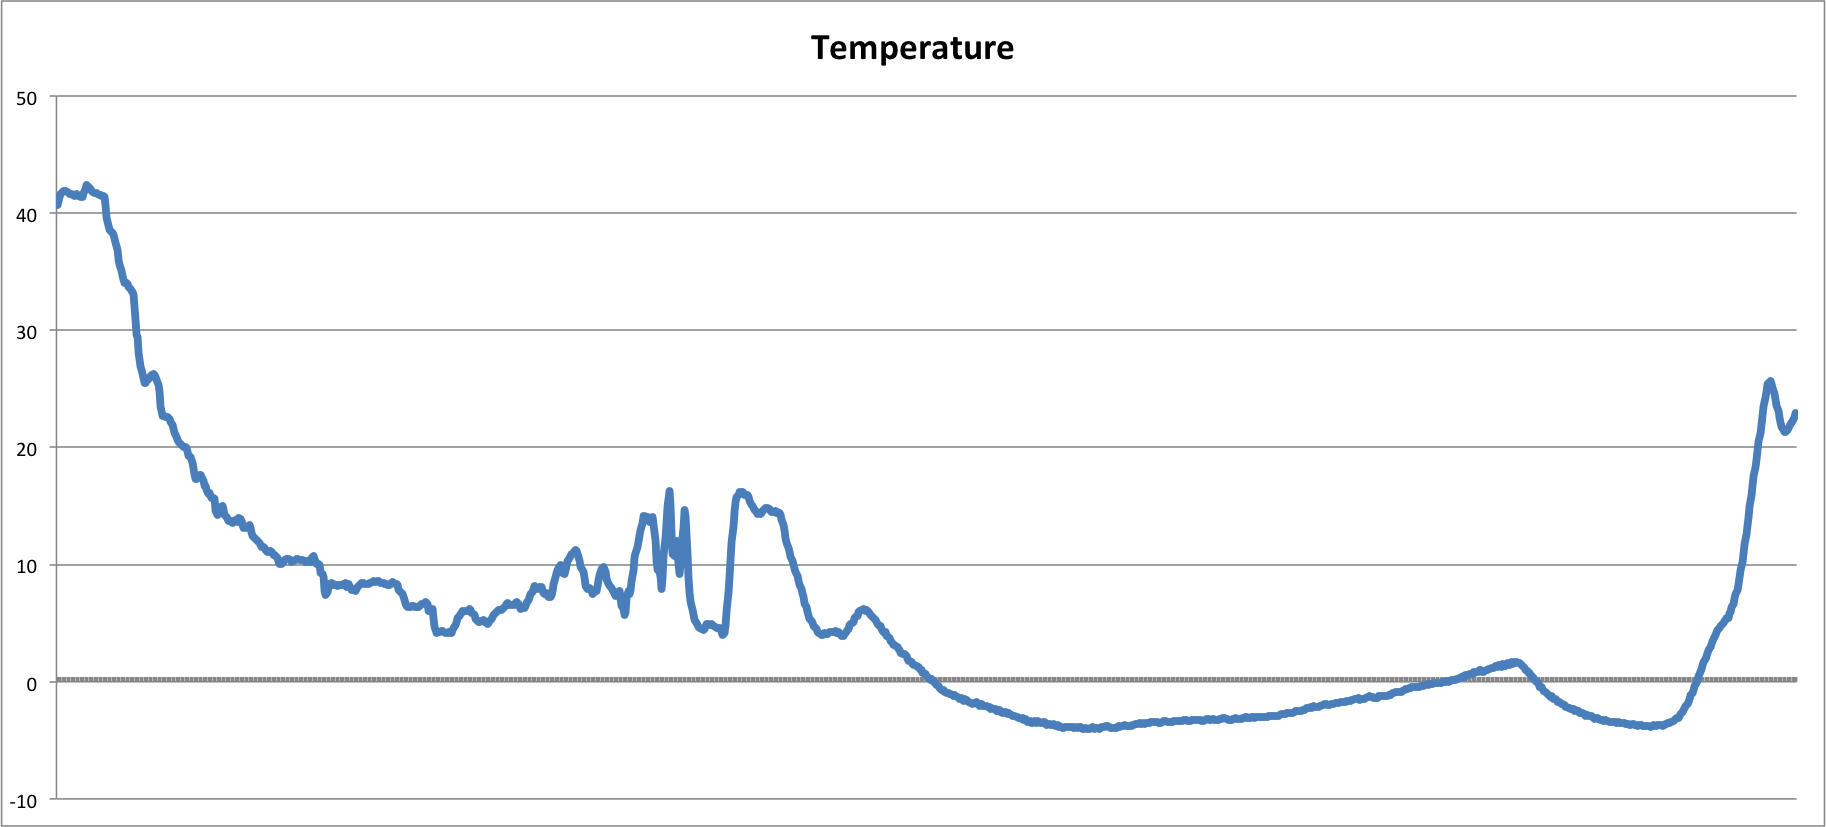
As you can see above, the temperature seems to fluctuate as the balloon rises through the atmosphere. Why is this so? Our best guess is cloud coverage, although the cameras didn't seem to indicate many clouds. It is also curious to see the temperature rise as reaches the top of the ascent. Perhaps the sun had something to do with it? Note on the descent, you can see a slight change in the rate of temperature increase, we believe this lines up with the fluctuations we saw during the rise (keeping in mind the descent was much faster than the rise). One final note, the temperature starts to decrease right at the end of the graph. Because we found the payload in the woods in the shade, we believe this decrease at the end signifies the payload at rest, waiting to be found.
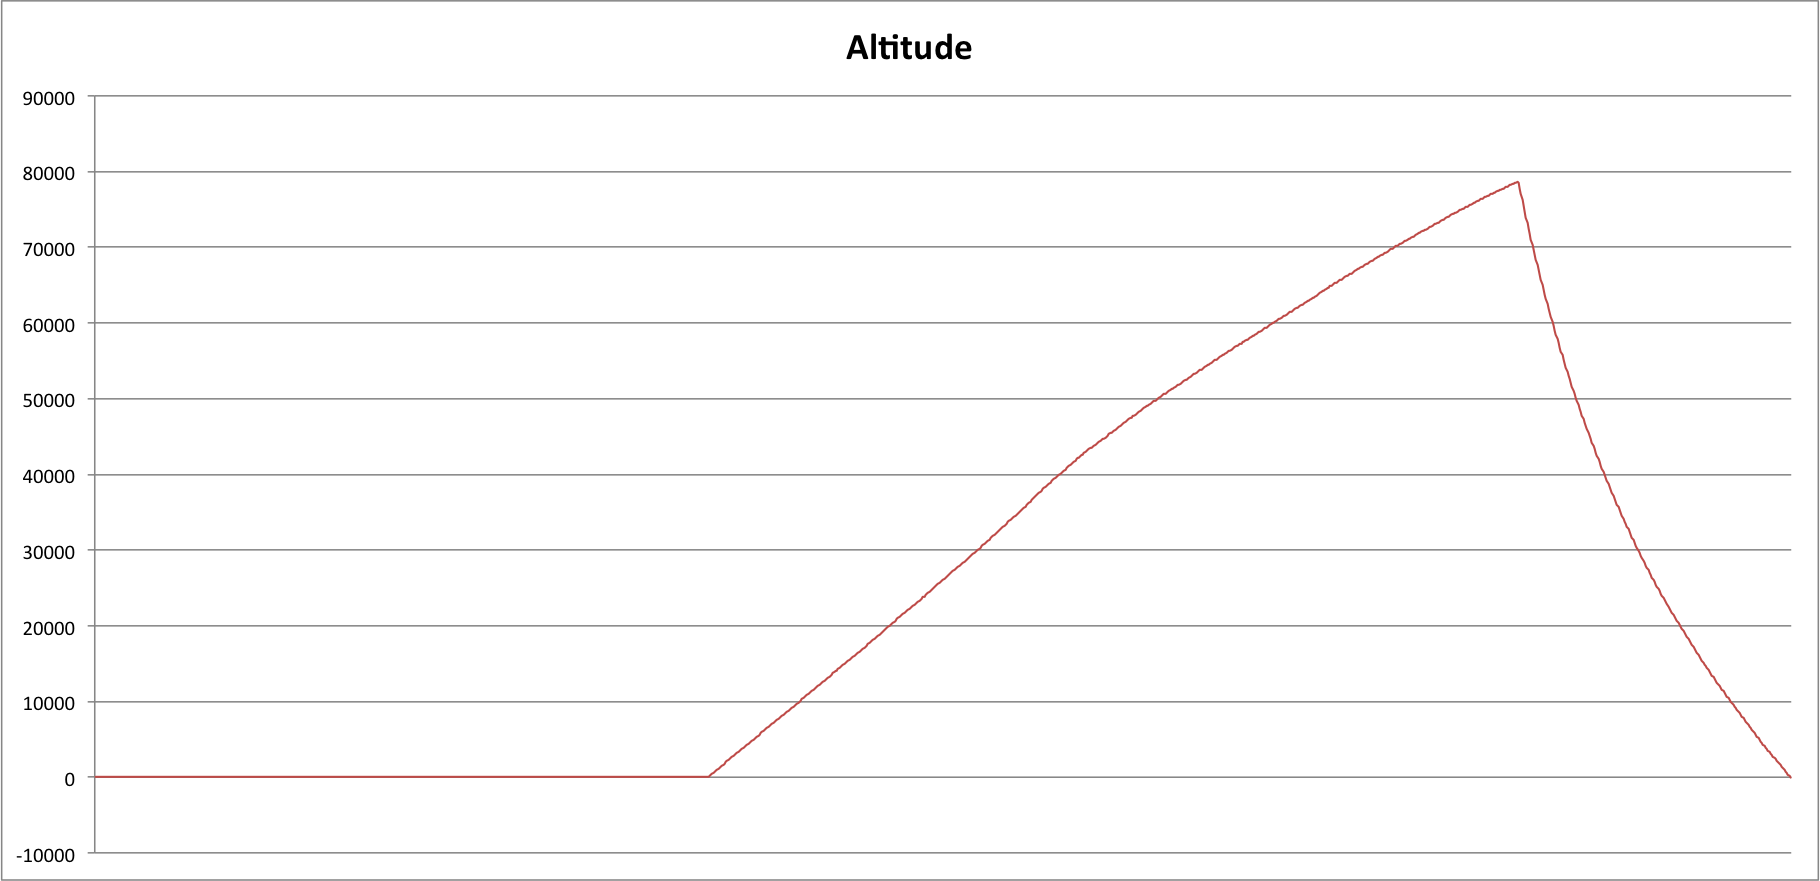
The altitude graph is about as straightforward as it gets. Unfortunately, due to calibration issues, the absolute values are invalid, but the relative height can still be analyzed. Of interest, the rate of ascent looks to be pretty constant, with only one slight change about halfway up. On the descent the rate is decreasing, signifying the work of the parachute and the thickening of the atmosphere.
LESSONS LEARNED
By far the most underrated and least talked about aspect of High Altitude Balloon launches is the recapture. Be prepared to walk into the woods, trample into someone's back yard, and get completely lost. Payloads don't discriminate; they will land wherever they want. And to that note, don't forget to look up; they may have got caught in a tree on their way down - so bring a ladder! If your payload lands in a hayfield, look for trampled crops; your payload will be hidden under brush. Just because you have GPS coordinates of your payload doesn't mean it will be easy to find. Be prepared to be searching for a while.

If this is your first time launching, plan for extra time to launch! We were hoping to launch our balloon right before sunrise to capture the best images possible; however, since this was our first time launching it took close to an hour between setup time and launch time.
Overall, make sure to have fun. Watching something you created float up into space is an unreal experience. As always, things will go wrong- in our case, one camera refused to autofocus (still not sure why) and the other camera died on the way down. Don't get too discouraged, if things go well you should be able to reuse 90% of your equipment (well everything except the balloon that popped and helium).
We've mentioned this before, but redundancy is very important. The role of backup trackers, dual cameras, and even redundant knots cannot be understated.